Introduction
Docker is a tool that performs operating system level virtualization that is known as container technologies, containers allow a developer to package up an application with all the parts it need, such as libraries and other dependencies, and ship it all out as one package.
Two are two type of edition for Docker, one is Community Edition (CE) and Enterprise Edition (EE). Community Edition can be used for development and testing purpose without any professional support where Enterprise Edition comes with yearly based license and 24×7 support.
Architecture
Docker uses a client-server architecture. Docker client talks to docker demon and docker demon does all task building, running and distributing containers. The client and demon communicate using API, over UNIX socket or network interface.Docker Client interacts with demon by sending the commands.
Installation
In this post we are going to install Docker, installation of containers, create and pull images.
OperatingSystem: Centos7
Installing Docker package #yum install docker-ce
Starting service #systemctl start docker
Enabling auto start on boot #systemctl enable docker
Once the Docker CE is installed on your system, let’s start search and pull images to the docker host and run your first container.
1: “Docker search” is the command to search the images on docker hub, eg:
#docker search ubuntu
2: Download the respected image using below command before we run our new container.
#docker pull docker.io/mcpayment/ubuntu1404
3: Let’s verify the image has been downloaded on local system using the below command:
#docker images
4: The downloaded images name is too big and difficult to remember, let’s give a name to image so that it’s easy to remember even after days:
#docker tag old_image_name:latest new_image_name:latest

#docker tag docker.io/mcpayment/ubuntu1404 ubuntu14:latest

5: So now we have ubuntu14 images downloaded on local system and we have tag the name as per our continence.
Let’s start your fist container:
#docker run --name first_container ubuntu14
The container has been installed but it’s in stopped status:
Let’s use -it to integrate with the shell:


–name : name of your container.
–hostname : Assign a hostname to the container
ubuntu14 : images we used to launch the container
6: List out all containers presently available on docker hosts:
Have look on the last column (STATUS)of below screenshot:
#docker ps -a

#docker ps - only for running container

Stop a running container:
#docker stop container_id or docker stop container name
7: DOCKER NETWORK:
We will setup a network with specific CIDR to run containers
Few basic networking command-
List out the available networks:
#docker network ls
How to see information related to a network:
#docker network inspect bridge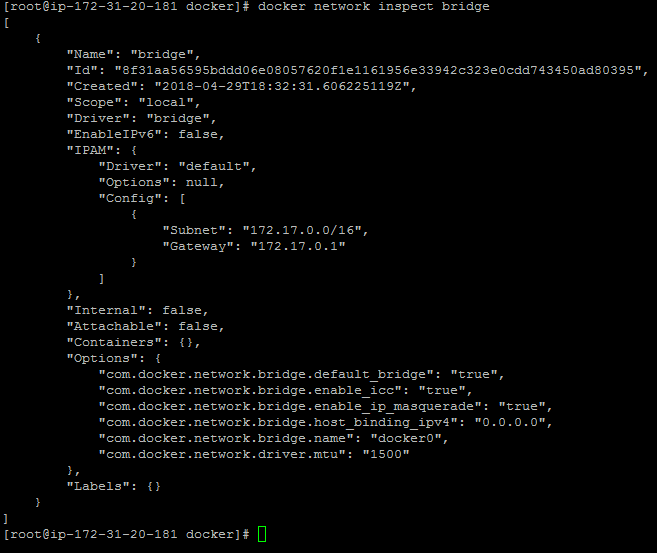
Create your first network:-
#docker network create --driver bridge network_name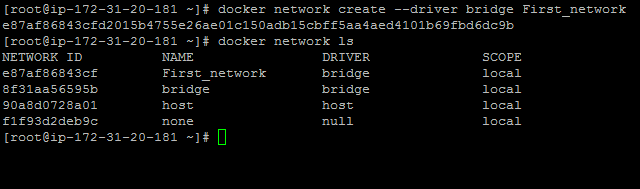
Create network with a specific CIDR range-
#docker network create --driver bridge --subnet 192.168.0.0/24 --gateway 192.168.0.1
Let’s verify the new network has taken the specified network range?
#docker network inspect first_network
Now Let’s install container again on the new network 192.168.0.0/16:
#docker run --name test2 --net=first_network --ip=192.168.232.1 -it ubuntu14 bash
8- Exposing Port
Exposing port to the container and docker host:-
#docker run  --name test3 --net=first_network -p 21:21 -it ubuntu14 bash

#docker inspect test3 |grep Port

Multiple ports:-
#docker run --name test5 --net=first_network -d -p 110:110 -p 20:20 -it ubuntu14 bash
Have look on the “PORTS” column

9: Directory Mapping:-
Maping the local (docker host)directory path to the container:-
#docker run --name tes3 --net=first_network -v /var//test/:/var/test/ -it ubuntu14 bash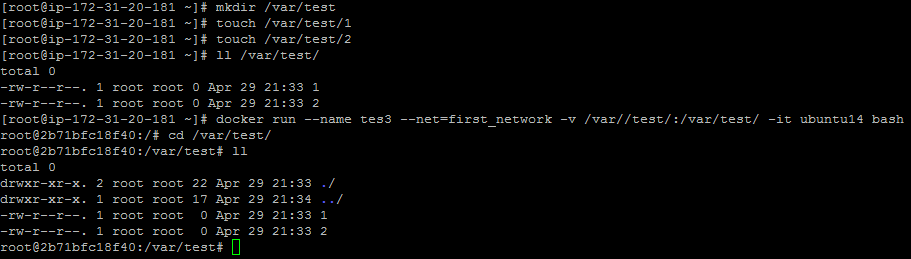
10: Run the container in detach mode
#docker run --name test4 --net=first_network -d -it ubuntu14 bash
–name: to specify container name
–hostame: Assign a hostname to the container.
–p: expose the port to the container and docker host, port number before “:” is for docker host and after “:” is for inside container.
-v – to map the localhost path inside the container.
-d – run the container in detach mode
11: Executing the commands inside the container:
#docker exec  -it test4 touch ls

#docker exec  -it test4 ls -lrt

12: COPY
Copy file from local host to the container:
#docker cp new test4:/tmp
13: Logs:-
Below is the container Logs directory:-
#/var/lib/docker/containers/Using the below command, get the Id of your container and check the logs:
#docker inspect test4 |grep IdYou will see a .json file inside the container id:
#ls -lrtd 5854ea202f367a4a278e8734a1c32e50c52047e963950b2681a8960807779a59-json.log

Thank you for reading the article!
Hope you liked it, we wish you best of luck. Stay tuned and keep learning!
Very nice Ravi. Useful information.